

Research › Guides
How to photograph a target so it measures well
GroupLab project. Researched and written with Claude. Testing and data collection by the developer. Written 2026-09-22; the data is from 2026-09-20.
This article is a draft. It is not finished, it is not linked from the research index, and anything in it may change.
What we found
on the developer's range day, GroupLab placed every photographed sheet to within 0.004 to 0.006 inch using its printed markers, so shot positions from photos are sound. Hole size is another matter: the same holes measured anywhere from 0.90 to 1.45 times the bullet diameter in photos, against a steady 0.92 to 0.95 in scans. The cause was not the camera's resolution or angle. It was the light: low sun puts shadow into and beside each hole, and the camera cannot tell shadow from hole.
How sure we are
nine photos of four sheets on one afternoon is enough to show the effect clearly and not enough to put a precise number on it. The advice below follows from it; the numbers will firm up as more photos come in.
The data
Two separate questions
When GroupLab reads a photo it answers two different questions:
- Where is each shot? It finds the sheet's printed markers, works out exactly how the paper sits in the picture (angle, distance, perspective) and maps every hole back onto the flat sheet. This is where your group size, mean radius and zero come from.
- How big is each hole? This helps GroupLab tell one hole from two overlapping ones, and it feeds the caliber guess.
The first holds up well in photos. The second is where light gets in the way.
Position: photos are precise
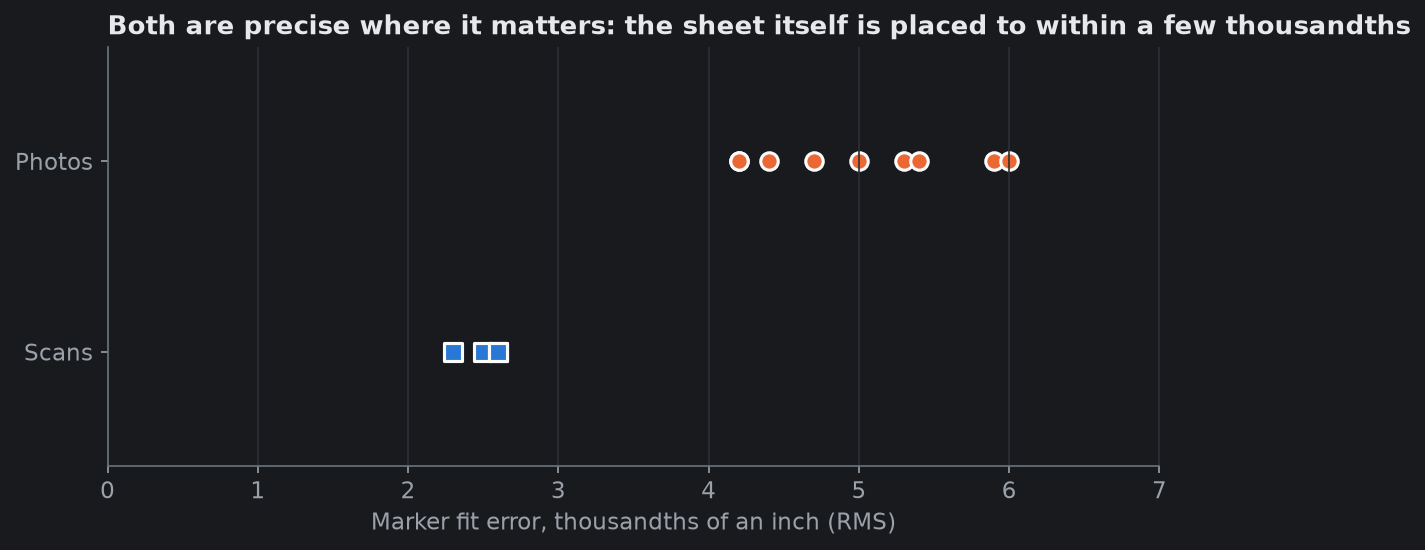
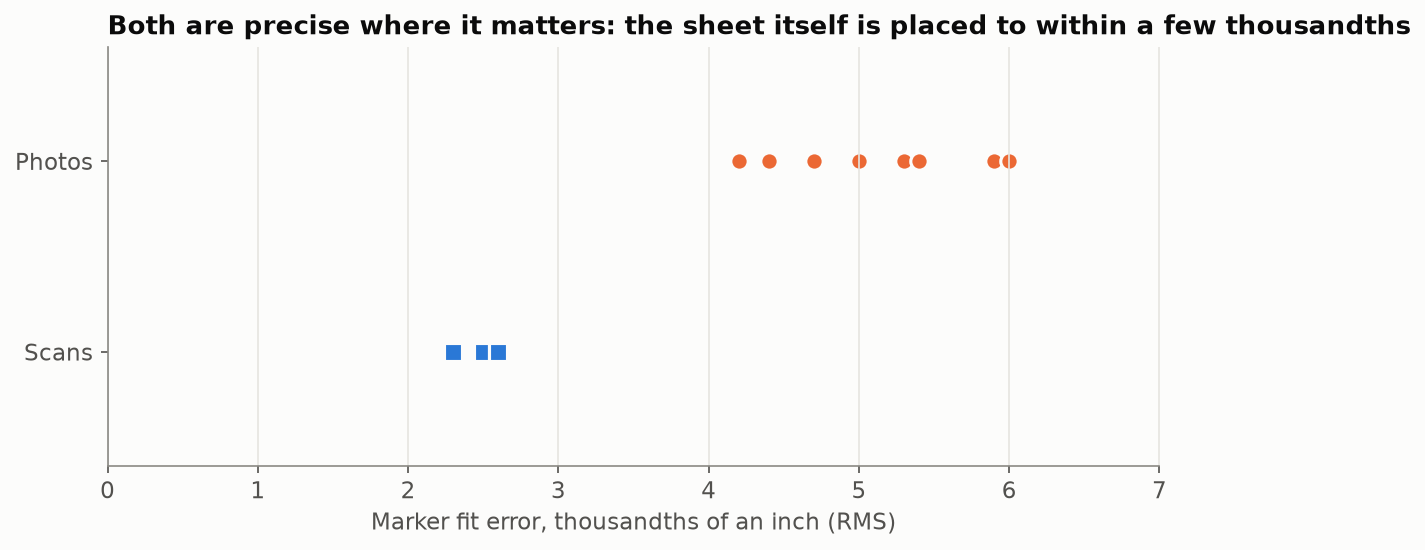
GroupLab reports how well the printed markers fit after it maps the sheet. On the range-day scans the error was 0.0023 to 0.0026 inch; on the photos, 0.0042 to 0.0060 inch. Photos are about twice as loose as scans, but both are small compared with any group a rifle can shoot. A few thousandths of an inch will not change anyone's mean radius.
Size: photos disagree with themselves
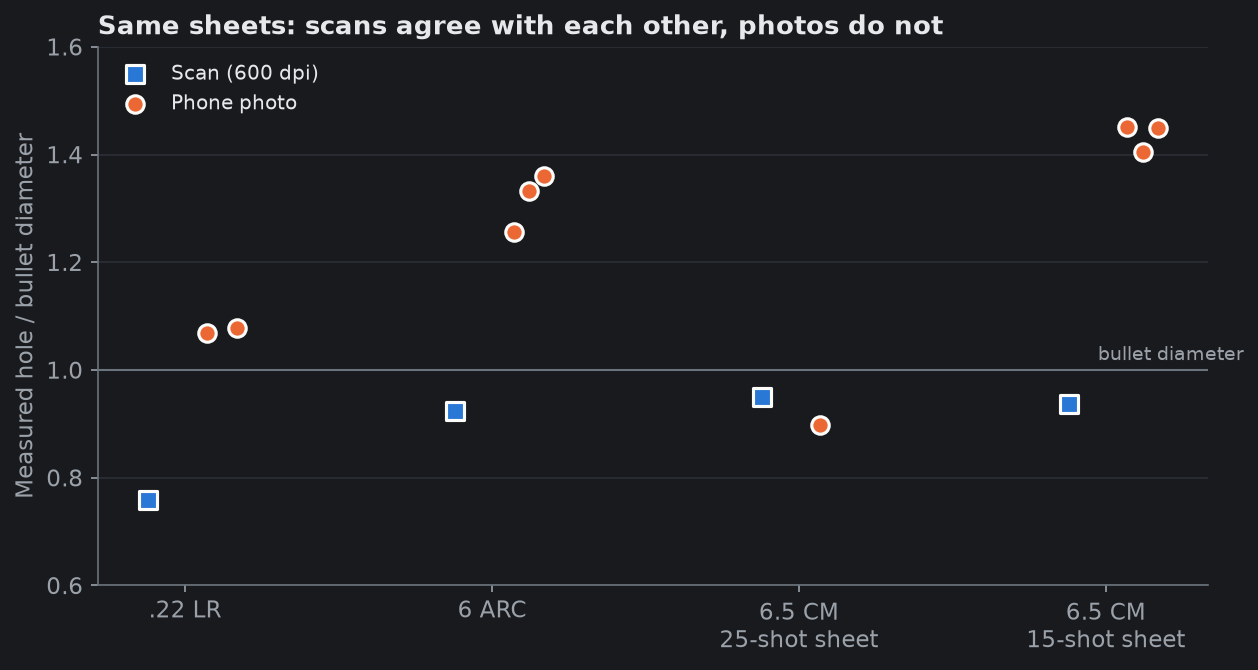
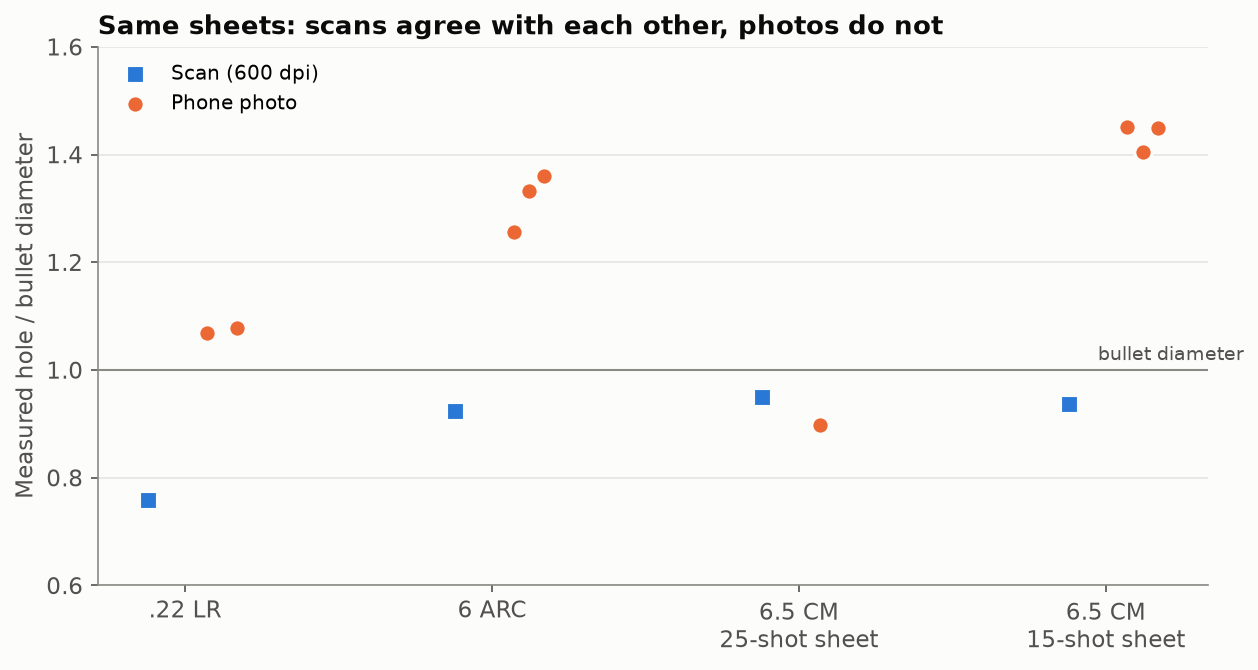
Each dot is the typical (median) hole size on one image, as a multiple of the bullet's diameter. The blue squares are 600 dpi scans; the orange dots are phone photos of the same sheets.
| Sheet | Bullet | Scan | Photos |
|---|---|---|---|
| .22 LR | 0.222 in | 0.77 | 1.08, 1.09 |
| 6 ARC | 0.243 in | 0.92 | 1.26, 1.33, 1.36 |
| 6.5 Creedmoor, 25-shot sheet | 0.264 in | 0.95 | 0.90 |
| 6.5 Creedmoor, 15-shot sheet | 0.264 in | 0.94 | 1.45, 1.41, 1.45 |
The scans of the three centerfire sheets agree within a few percent. The photos range from 10 percent smaller than the bullet to 45 percent bigger.
It was not resolution. Two photos of the 15-shot sheet taken at quite different resolutions (about 280 and 180 pixels per inch on the paper) gave 1.45 and 1.45. Two photos of different sheets at the same 180 pixels per inch gave 0.90 and 1.45.
It was not the angle. The worst reading, 1.45, came from the squarest, cleanest photo in the set, with all 34 markers found and the lowest fit error.
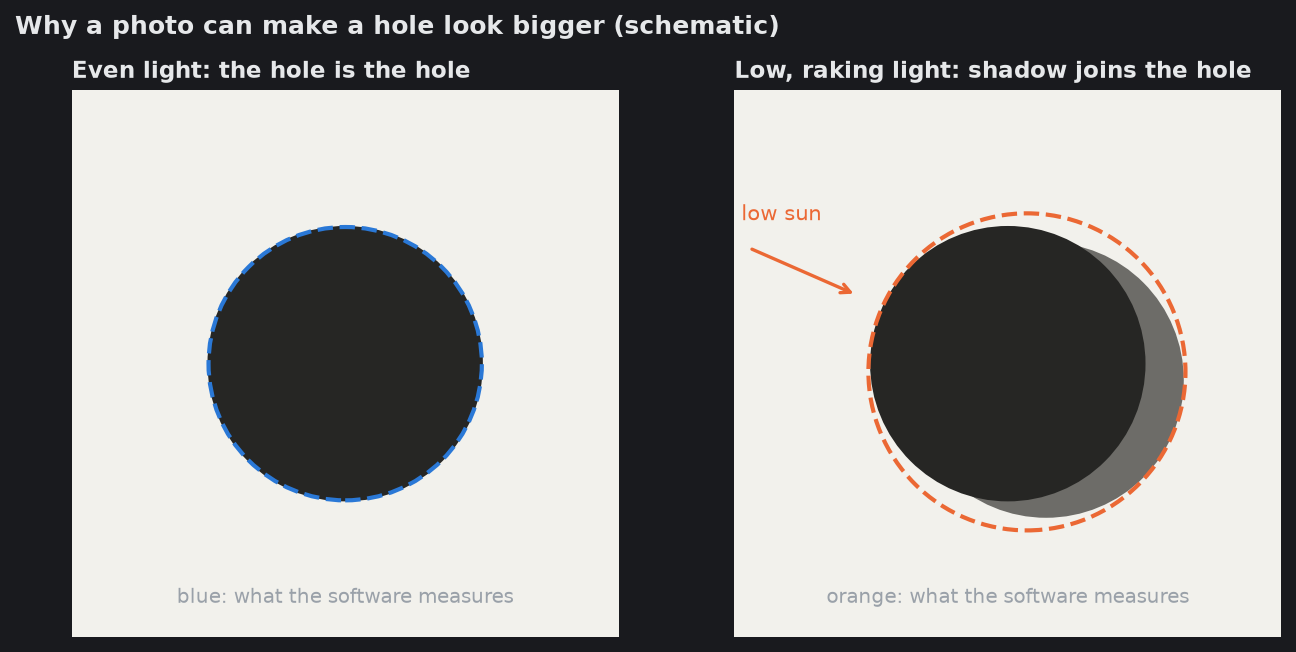
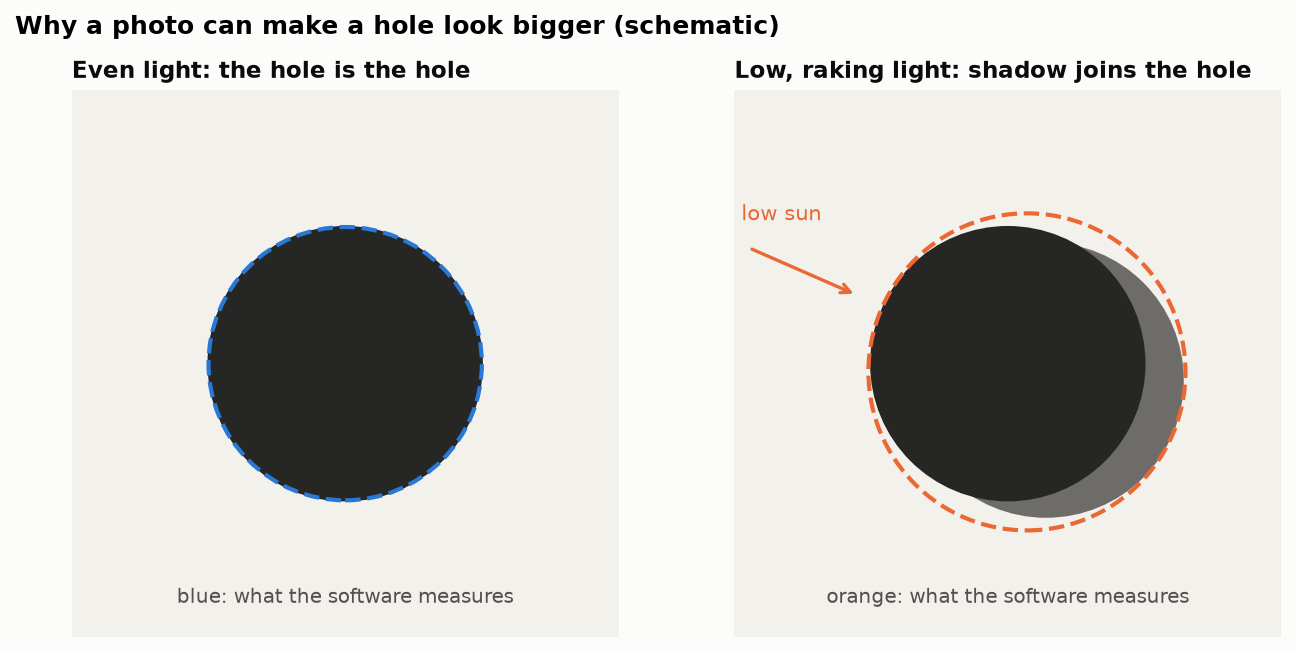
It was the light. The two 6.5 Creedmoor sheets were the same rifle, the same load and the same day. Their scans agree (0.95 and 0.94). Their photos do not (0.90 and 1.45). The 15-shot sheet was photographed later in the afternoon, with the sun lower. Low, raking light throws a shadow into and beside each hole, and a camera sees shadow and hole as the same dark shape.
What GroupLab does about it
Because of this finding, GroupLab no longer judges hole size in a photo against a fixed factor. Where a sheet has enough clean single holes, it uses the sheet's own holes as the reference for what one hole looks like on that image, so shadow that enlarges every hole equally stops mattering. The stated caliber is the fallback. On all thirteen images from this range day, that approach flagged at most one hole, including the photo where the old method flagged all fifteen. The caliber guess from a photo is shown as rough and is never preselected with more confidence than the image allows.
A target GroupLab did not print
A commercial target has no printed markers, so the scale has to come from something you tell GroupLab. There are three ways, and on three of the developer's phone photos of 2026-09-26 they were measured against the answer the markers give, on the same sheets. Every length was placed exactly where the markers put it, so these numbers are what each method gets wrong by itself, before any error in where you tap.
| method | where each shot lands, compared with the markers | group size (sigma) |
|---|---|---|
| a scale at each bull, two lengths at right angles | 0.001 to 0.003 in on average, 0.012 in at worst | within 0.1 percent |
| four corners of the paper | 0.007 to 0.010 in on average, 0.018 in at worst | 1.1 to 1.3 percent small |
| one length for the whole sheet | 0.007 to 0.026 in on average, 0.087 in at worst | 0.5 to 0.8 percent small |
Four corners remove the angle exactly and still read small here, the same way on all three photographs. The corners of the paper are at the edge of the phone's picture, where its lens bends straight lines most, and a four-corner fit cannot model that bend; the markers can, and do. A scale drawn at each bull only has to be right near that bull, where the bend is small.
These three photographs were nearly straight down. At a real angle a single length for the whole sheet gets much worse, which is the reason to draw a scale at each bull; photographs at 40 to 60 degrees (request 18) will say how much.
So, on a target GroupLab did not print: draw a scale at each bull, two lengths at right angles, from a ring's width or a grid square; or tap four corners when you have them. GroupLab says when the scales disagree, which means the photograph was taken at an angle, and carries that uncertainty into the group size.
A checklist for a good photo
- Even, soft light. Open shade, an overcast sky or indoor light from above. Avoid low sun across the paper, and avoid flash, which leaves a hot spot. Shade the whole sheet or none of it. The shadow of your hand or the phone across part of the sheet is the one thing on a kitchen counter that still costs a hole: on three photographs of 2026-09-26 a shadow's edge hid a shot and made paper read as a hole, until GroupLab learned to follow it, and a hard shadow is still worth avoiding.
- Hold it down outside the printed area. Weights or tape on the very corners. A torn tape tab over the paper can read as a hole, and on one of those photographs one did.
- Square on. GroupLab corrects for angle, but a straight-on photo keeps every hole round and every marker sharp.
- Fill the frame with the sheet, all markers included. Every corner marker and both codes in the picture, with a little margin. Do not crop them off.
- Flat paper. Take it off the backer if it is curled, or hold it flat. Waves in the paper move holes.
- Hold still and focus on the paper. Tap to focus on the middle of the sheet. A blurred edge blurs every hole.
- Use the main camera, not digital zoom. Step closer instead of zooming.
- One sheet per photo. Several sheets in one frame make identification harder and give each sheet fewer pixels.
- If it matters, scan it. For hole sizes, for caliber, or for a sheet you will compare against others, a flatbed scan at 600 dpi is the reference. See the scanner article for the traps.
A phone photo against a flatbed scan, same sheets
On 2026-09-26 the developer photographed three load sheets he had also scanned at 600 dpi: on a kitchen counter, with the Galaxy Z Fold 7's own camera at its default settings, a hand's shadow across the bottom third, the paper gray under the kitchen light, the corners taped, two of them turned a quarter in the frame. Each photograph was read by GroupLab and paired with the scan shot by shot.
| Sheet | Shots on the scan | Found in the photo | Median distance from the scan | Worst |
|---|---|---|---|---|
| 6 ARC, Dominus K | 25 | 25 | 0.015 in | 0.036 in |
| 6 ARC, Magnus S | 25 | 25, and one tape tear | 0.021 in | 0.040 in |
| 6.5 Creedmoor | 23 | 22, and one tape tear | 0.027 in | 0.057 in |
The positions are as good as the scans'. The shot not found on the 6.5 sheet touches a printed marker, where GroupLab does not look for holes, and the photograph put its center just inside the marker's zone where the scan put it just outside. The two tape tears matter more than the distances: on the 6.5 sheet the tear took the place of a real shot in the matching, and the mean radius read 0.86 in where the scan reads 0.21 in. Delete the tear on the analysis screen and the two agree.
The suppressor question comes out the same from the photographs. The two 6 ARC sheets gave a shift of 0.284 in between the suppressors from the photographs and 0.284 in from the scans, with the same test giving p = 0.051 and 0.050. Anybody with a phone can repeat that comparison.
Before this work the same photographs read 28, 27 and 24 marks: the counter showing inside the sheet's edge made the paper beside it read darker than it was, and so did the edge of the shadow, which also hid a real shot on all three sheets. GroupLab now measures the paper's brightness in smaller patches, follows a shadow's edge instead of smearing it, and does not count what lies outside the paper. The photographs are kept as tests, so this cannot quietly come back.
What this means
Photograph for position, scan for size. Positions from a readable photograph are sound to within a few thousandths of an inch, so a group size from a photograph is trustworthy. A hole size from one is not, and the reason is the light rather than the camera.
Shoot the photograph in flat light. Low sun puts a shadow into and beside every hole, and the camera cannot tell shadow from hole. Open shade, an overcast sky, or indoors under even light all work. Bright, low, side-on sun is the worst case and it is the one people naturally get at the end of a range day.
Stop believing a better phone would fix it. It would not. The effect is the same at every resolution tested here, because it is a property of the scene and not of the sensor.
Sources
- GroupLab measurements of the developer's range sheets, 2026-09-20: question 38 in docs/QUESTIONS-FOR-PLANNING.md and the commit 'Question 38 answered by measuring'. Pixels only; no image metadata was read.
- GroupLab detection pipeline notes (docs/DETECTION-PIPELINE.md).