Research › Guides
Scanner traps: cropping, DPI and color
On this page
GroupLab project. Researched and written with Claude. Testing and data collection by the developer. Written 2026-09-22; the data is from 2026-09-20.
What we found
on the developer's range day, 600 dpi scans let GroupLab place each sheet to within 0.0023 to 0.0026 inch, about twice as tight as phone photos, and gave hole sizes that agreed from sheet to sheet. The same scanner also cropped a quarter inch off two edges of a letter sheet without saying so. Scans are the reference, provided a few settings are right.
How sure we are
the numbers come from one scanner and six sheets. The traps below are general to flatbed scanners; how your own scanner names its settings will differ.
The data
Why scan at all#
A scanner is a camera with the lighting, distance and angle fixed. The paper lies flat on glass, lit evenly from underneath at a known resolution. That removes most of what can go wrong with a photo: no perspective, no shadow from low sun (see the article on photographing targets), no curl, and an absolute scale, because 600 pixels is exactly one inch at 600 dpi. That last point is what lets GroupLab detect a sheet printed at the wrong size.
Trap 1: the scanner bed is smaller than the paper#
Many flatbeds cannot capture a whole letter or A4 page. The developer's scanner produced images of 4958 by 6458 pixels at 600 dpi: 8.26 by 10.76 inches, from an 8.5 by 11 inch sheet.
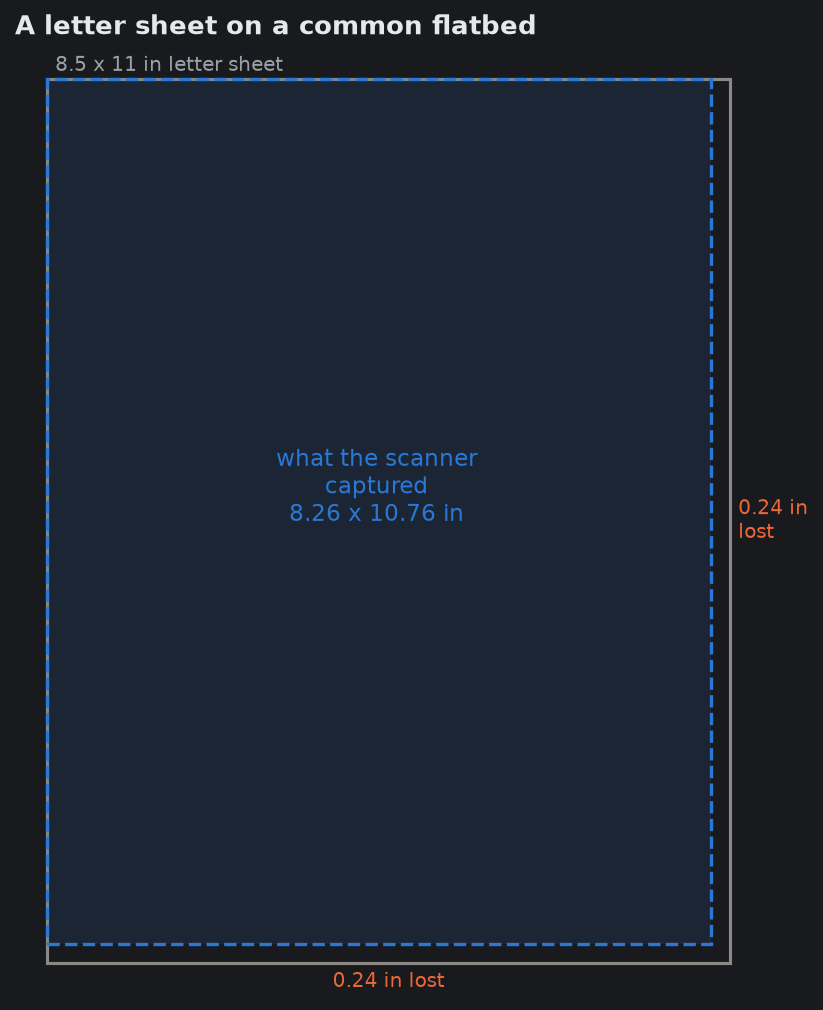
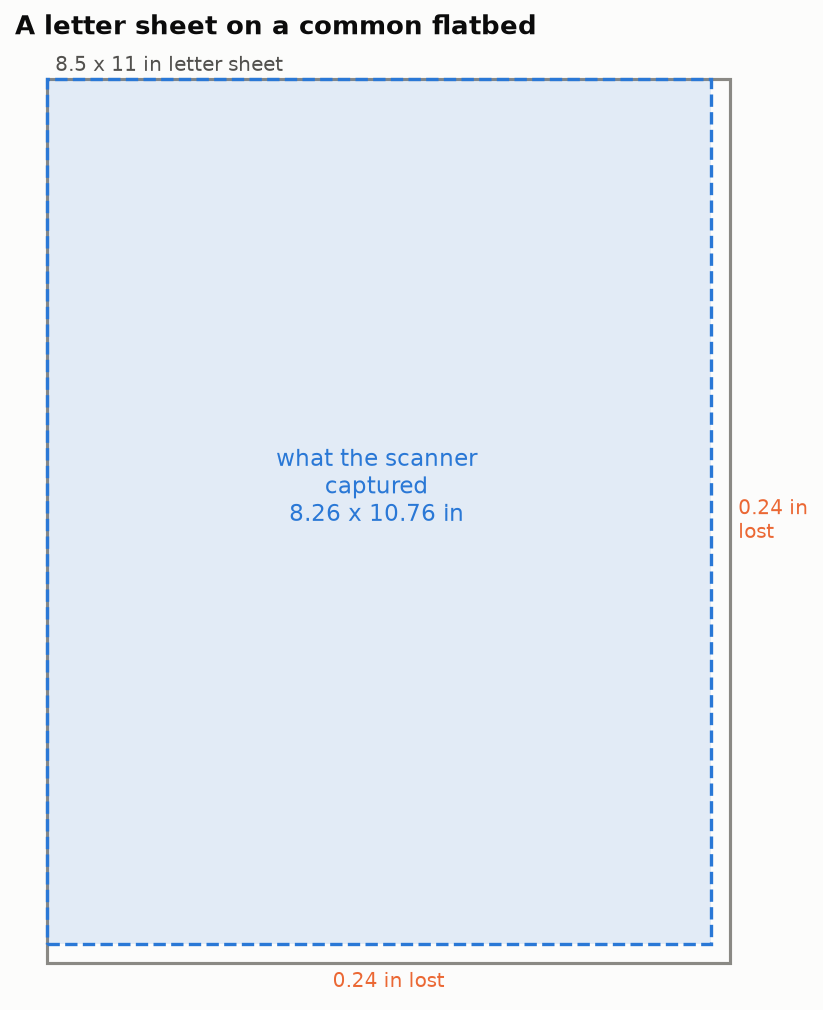
GroupLab sheets keep their markers and codes inside a margin, so a quarter inch lost at the edges does not matter for them. It does matter for:
- A sheet without GroupLab's markers, if you meant to set its scale from a printed ruler or a known distance near the edge. The scan's stated resolution, which GroupLab offers as the scale for such a sheet, is not affected by cropping.
- Any shot near the edge of a sheet, which may simply not be in the image.
What to do: place the sheet against the scanner's corner guide, check the preview shows every marker and both codes, and if your scanner has a "legal" or "full bed" option, use it.
Trap 2: black-and-white document mode#
Scanners made for paperwork often default to a black-and-white "document" or "text" mode. It turns every pixel pure black or pure white.
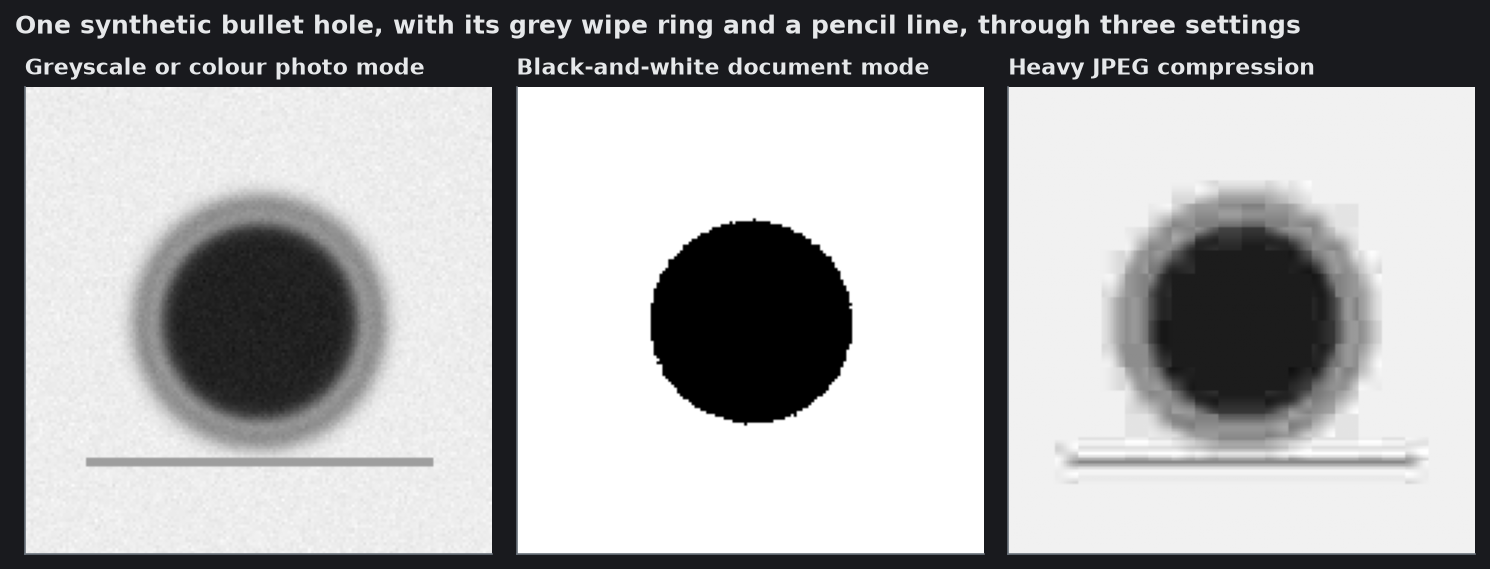
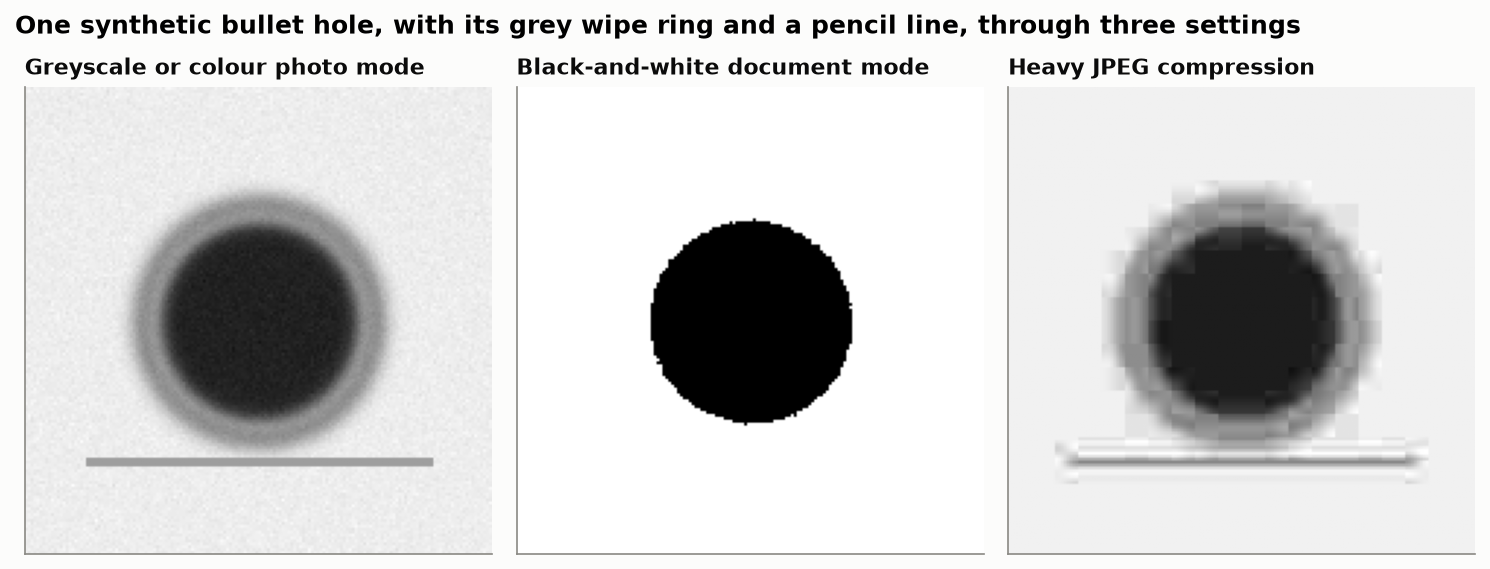
That destroys exactly what GroupLab reads: the gray edge of a hole, the gray ring of bullet wipe around it, and the difference between a hole and a pencil line. In the middle panel the wipe ring has vanished, the hole's edge is decided by a threshold nobody chose, and the pencil line has disappeared. On another sheet the threshold might instead turn the pencil line into a black bar.
What to do: scan in grayscale or color ("photo" mode). Color costs nothing but file size.
Trap 3: heavy compression#
Saving a scan as a low-quality JPEG makes blocks and halos around every edge (right-hand panel), and holes are nothing but edges.
What to do: save as PNG or TIFF if you can. If it must be JPEG, use the highest quality setting.
Trap 4: a resolution the scanner did not really scan at#
Some scanner software offers "interpolated" resolutions far beyond the sensor's real one, and some images carry a DPI label that is simply wrong (screenshots and edited files often say 72 or 96 dpi whatever their real scale). GroupLab measures its own sheets by their markers, and believes a stated resolution only when it puts the sheet within 15 percent of its designed size, so a label far from the truth costs you the print-scale check rather than your group sizes. A scan interpolated from a low real resolution is another matter: it holds no more detail than the low one.
What to do: scan at the scanner's real optical resolution: 300 dpi is enough for positions, 600 dpi is better for hole sizes and is what GroupLab's reference scans use. Do not resize or re-save the image in another program before opening it in GroupLab.
Trap 5: automatic "enhancement"#
Auto-contrast, sharpening, descreening, dust removal and "auto color" all change edges and grays in ways that vary from sheet to sheet. Some also auto-crop to what they think is the page, which can clip markers.
What to do: turn off every automatic correction you can find, and turn off auto-crop in favor of the full bed.
Trap 6: light through the paper#
Holes are holes because light (or the lid's white backing) shows through them. If the lid is open, or a dark backer sheet is still stuck to the target, holes may look gray or black depending on what is behind them.
What to do: close the lid, remove any backer or tape from behind the target, and scan every sheet the same way.
A good scan in one line#
Grayscale or color, 600 dpi optical, PNG, no automatic corrections, full bed, lid closed, all markers visible in the preview.
What this means#
Scan rather than photograph if you can. Twice the placement accuracy, and hole sizes that agree from sheet to sheet rather than varying with the light.
Check what your scanner actually produced, once. The scanner here cropped a quarter inch off two edges of a letter sheet and said nothing about it. Multiply the pixel dimensions by the stated resolution and see whether you get the paper size you fed it. If you do not, the settings are wrong and every sheet from that scanner is affected.
Turn off everything that improves the image. Sharpening, descreening, dust removal and automatic contrast all change the edges of a hole, which is the thing being measured. A flat, dull scan is the useful one.
Sources#
- GroupLab notes on the developer's second range day, entry 120, section 4 (docs/NOTES-FROM-PLANNING.md).
- GroupLab measurements for question 38 (docs/QUESTIONS-FOR-PLANNING.md).
- GroupLab Phase 0 results, print-scale detection (docs/PHASE0-RESULTS.md).
- Image scanner, optical and interpolated resolution. https://en.wikipedia.org/wiki/Image_scanner