

Tour › Targets
Targets
The twenty sheets GroupLab comes with and any you design, grouped by what they are for, and everything it takes to print the one you choose, on one screen.
This was two screens, the target library and printing. They did the same job, so they are one screen now.
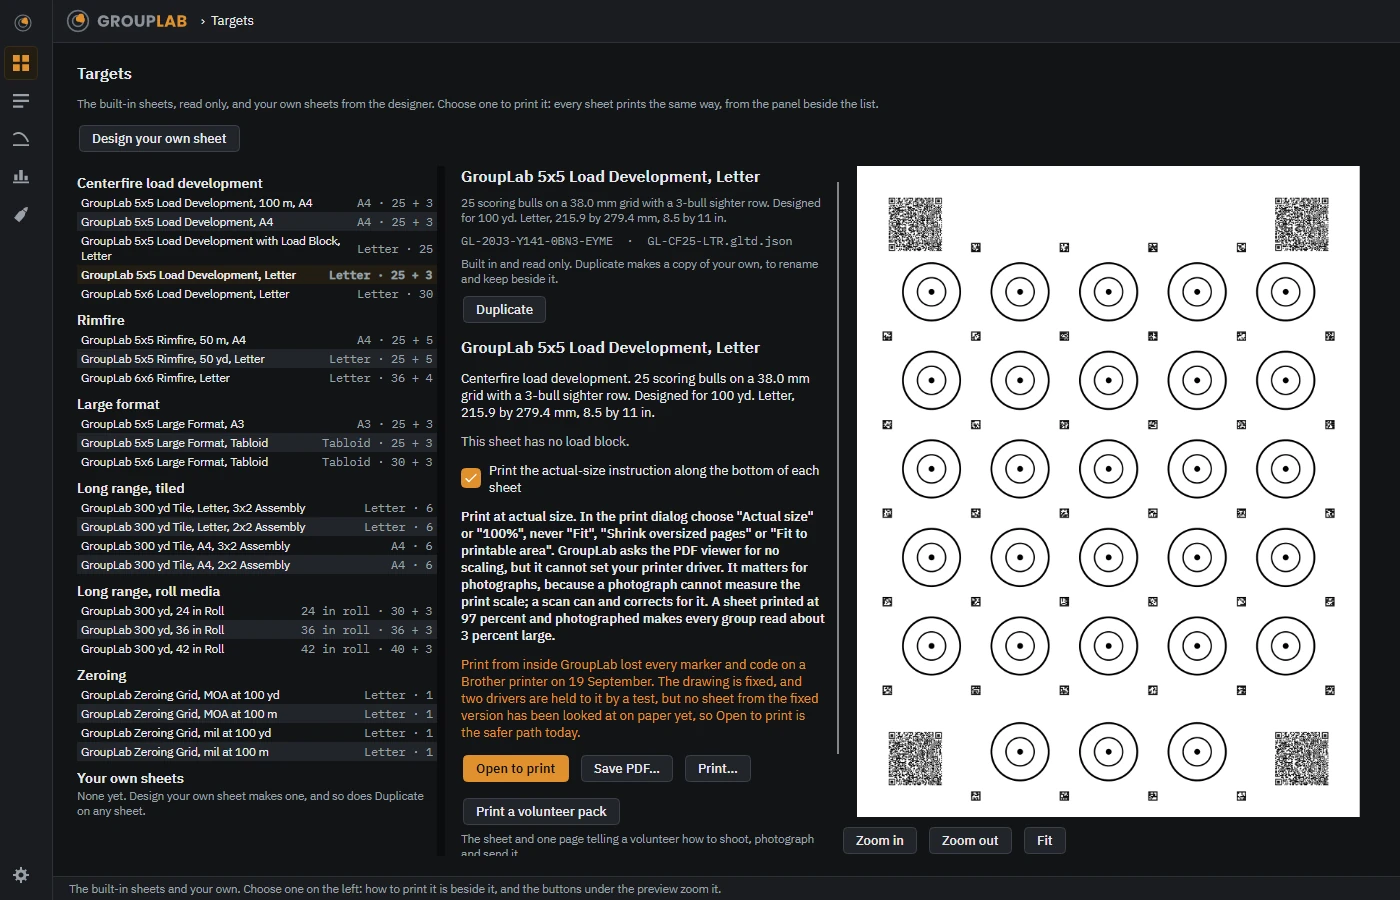
From the newest build of GroupLab, regenerated every week. Tap the picture for it full size.
What this screen is for
This is where you choose which sheet to print and print it. Every sheet is designed for a particular job at a particular distance, and the description under each says which. A GroupLab sheet is the easy path, because it carries its own scale, its own orientation and the positions of its bulls in the markers printed around them, so nothing has to be set by hand. It prints at its true size. A sheet printed smaller than it should be is still read correctly, bull by bull, because the markers shrank with everything else. It matters for photographs, because a photograph cannot measure the print scale; a scan can and corrects for it. A scan measures the scale and reports every size in real inches; a photograph of a sheet printed at 97 percent makes every group read about 3 percent large. So this screen asks the PDF viewer for no scaling, prints the instruction along the bottom of the sheet so you can check with a ruler, and refuses outright when the paper cannot hold the sheet.
Without a GroupLab sheet
Nothing on this screen applies. It holds and prints GroupLab's own sheets; a target from anywhere else is opened on the marking screen instead. What GroupLab can measure.
What you are looking at
- The list, grouped by what the sheet is for. Centerfire load development, rimfire, large format, long range on tiled pages, long range on roll media, and zeroing grids. The right hand column of each row is the paper size and how many scoring bulls it has, with the sighter bulls after the plus sign.
- The sheet you have chosen, beside the list. Its name and full description: the bull spacing, the sighter row, the distance it was designed for, and the paper it wants. Choosing a sheet fills everything under it at once.
- Built in and read only. The twenty that come with GroupLab cannot be edited. Duplicate makes a copy that is yours, to rename and change.
- The load block. Blank, to write on at the range, or filled in now from its fields.
- Print the actual-size instruction. Adds a line along the bottom edge of each sheet telling whoever prints it to choose Actual size and never Fit. Leave it on unless you are printing for yourself and know the driver.
- Open to print, Save PDF and Print. Open to print hands the PDF to your usual viewer, which is the safest route today. Save PDF writes the file. Print goes straight to a driver, on Windows.
- Print a volunteer pack. The sheet plus one page telling somebody else how to shoot it, photograph it and send it back.
- Previous sheet, Next sheet. For a tiled sheet that spans several pages. The counter says which page of how many.
- The preview, with Zoom in, Zoom out and Fit. The artwork of the page about to print, filling the rest of the screen. It is artwork, not a photograph, so it stays sharp however far you go in; its text is drawn in the PDF, so the preview shows slightly less than the paper will.
- Design your own sheet. For a sheet no built-in one covers. The designer opens beside the list, and your own sheets appear at the bottom of it.
What you would do here
- Find the group that matches what you are doing: load development, rimfire, zeroing.
- Pick a sheet whose distance and paper size match your range and your printer.
- Leave the actual-size instruction on if anybody but you will print it.
- Press Open to print, and in the print dialog choose Actual size or 100 percent, never Fit or Shrink oversized pages.
- Measure one printed bull with a ruler against the size in the description before you shoot a whole session on it.
Where it fits
This is usually where a session starts. You shoot the sheet, then photograph or scan it and open it in marking.